Tuesday, November 30, 2010

Garlicky Hummus

cinrose fig2-1102

What's a little garlic among friends is what I always say.....Actually, I only just started saying it after I tasted this stuff...and took it over to some neighbors and forced them to try it.


Personally, I am not a huge fan of chickpeas, so I have never been particularly drawn to hummus. But this stuff is good. Really good.

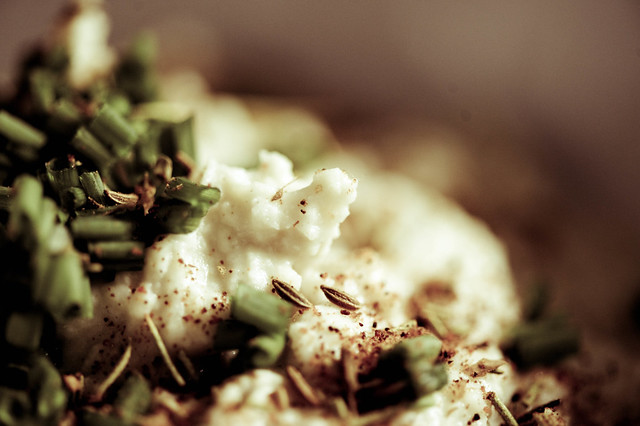
A friend of mine shared some moroccan spices that she bought with me, so that is what I sprinkled on top this time around. The original recipe calls for a sprinkling of paprika, but I would imagine that any spice you like would be a wonderful addition. The garlic is a great base. I am considering adding roasted red pepper and maybe some feta cheese....oregano....whatever. Hummus can be made a million different ways. Go crazy.

cinrose fig2-1109

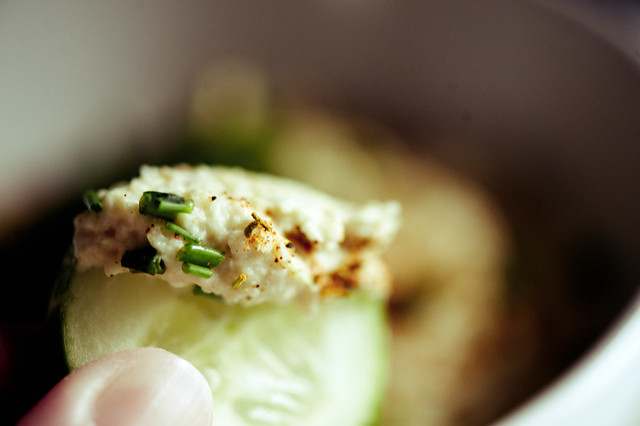
It's great on pita bread, but just dipping cucumbers straight in is my favorite combination.

cinrose fig2-1115


Garlicky Hummus
adapted from Tyler Florence and Family Meal

1 15oz can of garbanzo beans, drained and rinsed
5 large garlic cloves
1/4 cup tahini
1 tablespoon fresh lemon juice
1 teaspoon salt
2 tablespoons extra virgin olive oil
2 tablespoons boiling (or just really, really hot) water
a handful of chives, chopped
a sprinkle of paprika (or moroccan seasoning, or the herb of your choice)

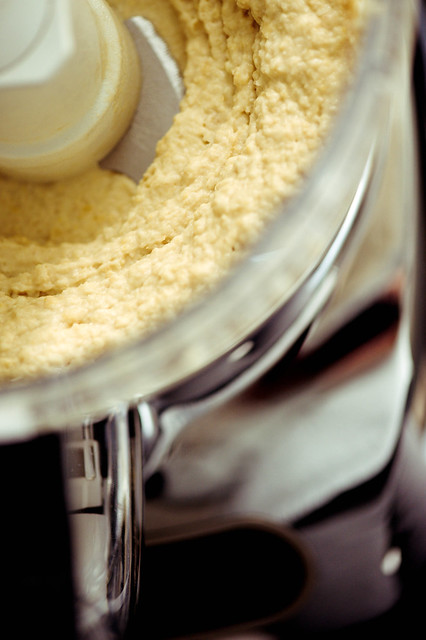
Put the rinsed garbanzos, peeled garlic cloves, tahini, lemon juice, salt and olive oil in a food processor and let 'er rip until they're all well combined and there aren't any large garbanzo chunks hiding in there. Then add the 2 tablespoons of hot water while pulsing a bit more until it's light and fluffy. After removing from the processor, add chives, paprika (or moroccan seasoning) and perhaps an added drizzle of extra virgin olive oil.

This is perfect served with wedges of pita bread, on crackers, or just as a dip with veggies. Yum!!!

Note: I've made this a grand total of 3 times in the past couple weeks. The last time I made it (I doubled the recipe), I didn't realize that I goofed and bought 1 can of garbanzos and one can of great northern beans until I dumped both cans into the strainer to rinse.....oops. No matter. The white beans go perfectly, and the only difference was that the dip needed a little less water. The white beans have more moisture than garbanzos.

Additional Note: (in case you're worried...) I actually had an appointment to have my teeth cleaned the morning after eating a lot of this stuff. Needless to say, I was a little worried for the 'safety' of the dental hygenist. All was fine, and the only comment made to me was about how 'boring' my teeth are.

Friday, October 29, 2010

Chocolate Crinkle Cookies

mfortson basic + bliss-0002

Chocolate Crinkle Cookies.....

mfortson basic + bliss-0015

Honestly, there isn't much to say about these.... the pictures pretty much say it all.

mfortson basic + bliss-0028

Can't you almost taste them?

mfortson basic + bliss-0014

It's like a powdered donut (one of my personal favorites) and a chocolate bar rolled into one.

mfortson basic + bliss-0024

And if you think you've had chocolate crinkle cookies before.... you might want to give these a shot anyway. They have mini chocolate chips inside. Genius I tell ya, genius. Oh, and some serious chocolate overload to boot....but a little chocolate overload never hurt anyone. In fact, sometimes it's for the best.

mfortson basic + bliss-0013

Chocolate Crinkle Cookies
adapted from Williams Sonoma Baking Essentials

4 oz semisweet chocolate chips
1/4 cup (2 oz) unsalted butter
1 1/2 cups all purpose flour
1/2 cup cocoa powder
2 teaspoons baking powder
1/4 teaspoon salt
4 large eggs
2 cups granulated sugar
1 teaspoon vanilla extract
1 1/2 cups mini semisweet chips
1/2 cup (to 1 cup) confectioners sugar

Place the semisweet chips and butter into a double broiler and gently heat and stir until melted. Remove from heat and let cool.

In a large bowl, mix the flour cocoa powder, baking powder and salt. Mix together with a fork until well combined.

In a stand mixer, combine the eggs, granulated sugar and vanilla and beat on medium speed until the mixture both lightens in color and thickens (about 3 minutes or so). Add the melted chocolate mixture to the blender and mix until just combined. Add the dry ingredients in 2 to 3 batches and mix until just combined. Finally, add the mini chocolate chips and mix until they are distributed throughout.

Cover the bowl and place in the refrigerator for 2 hours or so, until the dough is firm enough to roll into little balls.

Preheat oven to 325 degrees.

Roll cooled dough into 1 tablespoon-sized balls. I always use my trusty little mini ice cream scoop for cookies....that way they all come out uniform and my obsessive compulsive side can rest easy. Once the dough is rolled into a ball, drop it in to the confectioners sugar and roll it around to coat it. Then place it on a parchment lined cookie sheet. Repeat with the rest of the dough.

Bake for 13 to 17 minutes until the tops are cracked and feel firm when touched. Cool and then eat.

Thursday, October 21, 2010

Blackberry Crumb Cake

soulshine secret garden-9906

I feel like it's been a while since I shared a cake. Today seemed as good a time as any, so here ya go.


Blackberry Crumb Cake. Blackberries are one of my favorite things on this earth.

soulshine secret garden-9912

This recipe is from The Barefoot Contessa. She used fresh blueberries, but you can use any berry you'd like. I'm sure she won't mind. I have made this particular cake 3 times now. The first couple times I did indeed use fresh blueberries, but they aren't in season any more, and I had some frozen blackberries in my freezer. It was killer. Both ways.

soulshine secret garden-9927

Streusel topping also ranks pretty darn high on my list of favorite things...yours too? Oh good.
This one's a keeper. Trust me.

Blackberry Crumb Cake
adapted from Ina Garten and foodnetwork.com

To make the streusel topping:
1/4 cup granulated sugar
1/3 cup light brown sugar, lightly packed
1 teaspoon ground cinnamon
1/8 teaspoon ground nutmeg
1/4 pound (1 stick) unsalted butter, melted
1 1/3 cups all-purpose flour

Combine the flour, granulated sugar, brown sugar, cinnamon, and nutmeg in a bowl. Stir in the melted butter. Mix well and set aside.

To make the cake:
6 tablespoons unsalted butter, at room temperature (3/4 stick)
3/4 cup granulated sugar
2 extra-large eggs, at room temperature
1 teaspoon pure vanilla extract
1/2 teaspoon grated lemon zest
2/3 cup sour cream
1 1/4 cups all-purpose flour
1 teaspoon baking powder
1/4 teaspoon baking soda
1/2 teaspoon kosher salt
1 1/2 cups fresh/frozen blackberries, roughly chopped (or 1 cup fresh blueberries)


Preheat the oven to 350 degrees F. Butter and flour a 9-inch round baking pan.

Cream the butter and sugar in the bowl of an electric mixer fitted with the paddle attachment on high speed for 4 to 5 minutes, until light. Add the eggs 1 at a time, and mix until just combined, then add the vanilla, lemon zest, and sour cream. In a separate bowl, combine the flour, baking powder, baking soda, and salt. With the mixer on low speed, add the flour mixture to the batter until just combined. Gently mix the berries with about a tablespoon or so of flour...just enough to barely coat them. Gently fold in the berries and stir with a spatula to be sure the batter is completely mixed.

Spoon the batter into the prepared pan and spread it out with a knife.

With your fingers, crumble the streusel topping evenly over the batter. Bake for 40 to 50 minutes, until a cake tester comes out clean. Cool completely and serve.

Monday, October 11, 2010

Spicy Chicken Tenders or Non-Spicy Chicken Tenders.....whichever you prefer


Simple, simple, simple......and yummy!  These were slightly spicy and delicious.

DSC_8405 sfaded

They are coated in a cornmeal crust with some cayenne pepper and chili powder mixed in, which resulted in a light and crunchy crust that I loved.  But I am a little biased, and am also a huge fan of cornmeal these days.  (Note: If you're feeding either a kid, or a picky eater, you can adjust the cayenne pepper to suit. I have made it one other time and I believe I put in half the cayenne pepper that the recipe calls for, without a complaint from the natives.)

DSC_8408 sfaded
And you bake them in the oven.  No frying mess. Yay!  I was sold immediately. I breaded them a couple hours ahead of dinner so they were all ready to just pop into the oven. Really. They can't be beat.

DSC_8412 sfaded
The honey mustard sauce that accompanies these is a must-have.  It is frighteningly simple to put together, the kick from the dijon was wonderful, and it looks pretty alongside.  Your friends will ask you where you got it....

DSC_8414 sfaded
These could be served as an appetizer, or as a main dish.  I served them alongside a vegetable parmesan, to satisfy those at the table who need a little something else with an all-veggie dish.  It did the trick.

Spicy Chicken Tenders with Honey Mustard Sauce
adapted from Giada De Laurentiis and foodnetwork.com

1 cup all-purpose flour
1 tablespoon kosher salt, plus extra for seasoning
3 large eggs, at room temperature, lightly beaten
3 tablespoons hot sauce (recommended: Tabasco)
1 cup cornmeal
2 tablespoons chili powder
1 teaspoon cayenne pepper
1 1/2 to 2 lbs of chicken tenders
Olive oil, for drizzling
Kosher salt

Put an oven rack in the center of the oven. Preheat the oven to 425 degrees F. Spray a heavy baking sheet liberally with vegetable oil cooking spray or line it with parchment paper. Set aside.

Breading:
In a medium bowl, mix together the flour and 1 tablespoon salt. In a second medium bowl, whisk together the eggs and hot sauce. In a third medium bowl, mix together the cornmeal, chili powder and cayenne pepper.

Dredge the chicken in the flour and then into the egg mixture. Allow any excess egg mixture to drip off and coat the chicken in the cornmeal mixture.

Arrange the breaded chicken in a single layer on the prepared baking sheet. Drizzle with olive oil and season with salt, to taste. Bake until golden and cooked through, about 15 to 17 minutes.

Honey Mustard Dipping Sauce:
1/3 cup honey
1/3 cup Dijon or whole-grain mustard

Mix the two together until smooth. Set aside to serve with tenders when ready.

Saturday, October 9, 2010

Cranberry-Pistachio Biscotti

Biscotti.....

They are undoubtedly the perfect accompaniment to a cup of hot tea. Rustic, but still elegant. And after going for a 'dunk', melt in your mouth delicious.

soulshine toquade-9016

These have the added pleasure of a little sweetness from the cranberries and some added crunch as well as a little salty bite from the pistachios (my pistachios were salted). Biscotti are about as simple as a cookie comes, and homemade biscotti are not even comparable to the store bought variety. You know you want to.....make some!

soulshine -9029

Cranberry-Pistachio Biscotti
adapted from Williams Sonoma Baking Essentials

2 cups all purpose flour
1 1/2 teaspoons baking powder
1/2 teaspoon salt
2 large eggs
3/4 cup granulated sugar
1/2 cup (4 oz) unsalted butter, melted and cooled
1 1/2 teaspoons orange zest
1 teaspoon vanilla extract
1 teaspoon almond extract
1 cup coarsely chopped pistachios
1/2 cup dried cranberries

Preheat oven to 350 degrees.

In a bowl, combine the flour, baking powder and salt.

In a stand mixer, combine eggs and sugar and beat at medium speed until light in color and thick (approx 3 minutes). Add the melted butter, orange zest, vanilla and almond extract and blend until combined.

Gradually add the dry ingredients to the wet ingredients in the mixer and blend until just combined. Then add the pistachios and cranberries, and again, mix until just combined.

You will have enough dough for 2 cookie 'logs'. Remove half of the cookie dough from the mixing bowl and on a cookie sheet lined with parchment paper, form a flat 'log' about 10 inches long and 3 inches wide. It doesn't have to be perfect, these are beautiful rustic looking cookies. Just pat and shape until you've got it about right. Then, scoot that bad boy over, and shape a similar 'log' with the remaining cookie dough.

Bake the logs in the oven for for 20 to 25 minutes. They should be firm, golden and a little crisp on the outside. Let logs cool on the baking sheet for about 10 minutes. Gently transfer one log to a cutting board and using a serrated knife, slice the log into 3/4 inch wide pieces. Do the same with the other log.

Lay the slices back on the parchment lined cookie sheet with the cut side down, and bake again for 17 to 22 minutes. Let cool for 5 minutes immediately out of the oven, and then transfer to a rack to cool completely.

Wednesday, September 15, 2010

Apple Cake...Williams-Sonoma Style...

Aaaaahhhhhh fall.....

The weather has taken a huge turn for the better, the kids are back in school, and guess what? The apples are back!!! Oh, how I love the apples.

cinrose brown2-9116

Everyone, meet Apple Cake. Apple Cake, this is everyone.

cinrose brown2-9121

This was a perfect fall treat. Delicious with tea, but then again, I eat all desserts with tea.

cinrose brown2-9115

A little apple, a little walnuts, and everyone can use a little cream cheese frosting every once in a while, right? This was very reminiscent of spice cake with little pieces of sweet apple mixed in there. It was delicious. A definite keeper.


I have another apple cake recipe up my sleeve...so stay tuned for Apple Cake Round 2!!!

Apple Cake
adapted from Williams-Sonoma Baking Essentials

2 cups all purpose flour
1 teaspoon baking powder
1 teaspoon baking soda
1 teaspoon ground cinnamon
1 teaspoon ground cloves
1/2 teaspoon salt
3/4 cup (6 oz) unsalted butter at room temperature
1 1/2 cups granulated sugar
3 large eggs
1/2 cup buttermilk
2 cups peeled and diced apples (I used Granny Smith, about 1 and 1/2 apples did the trick. I diced my apples pretty small, which required fairly thin slices.)
1/2 cup walnuts, chopped and toasted

for frosting:
1 stick unsalted butter
1 8oz package of cream cheese
1 pound confectioners sugar
(next time I make this icing, I will probably use half of all 3 ingredients. I always have extra, and there is always way too much icing on the cake, if you ask me.)

Preheat oven to 350 degrees. Butter and flour a 9x13x2 inch cake pan.

This is the point when I usually make my buttermilk. I measure out almost the amount of buttermilk that the recipe calls for in whole milk, and then top it off with a little white vinegar. By the time you are ready to add the buttermilk to the recipe, it will be ready to go. I believe the rule of thumb is 1 cup of milk to a tablespoon or so of vinegar.

Measure flour, baking soda, baking powder, salt, cinnamon and cloves into a bowl. Mix with a fork until well combined.

Cream butter and sugar until light and fluffy (2-3 minutes). Add eggs one at a time and mix until just combined. Once you've finished adding the eggs it's time to add the dry ingredients. Add the flour/spice mixture in 3 batches, starting with the flour and alternating with the buttermilk. ***Be very careful not to overmix.*** When you add the third and final round of flour, throw the apples and walnuts in there too, and remove the batter from the mixer. At this point, I mixed the apples, walnuts and remaining batter til combined by hand. Warning: If you overmix the batter, you will perhaps get a heavier and not so light cake.

Once batter, apples and walnuts are all evenly combined, spread batter in cake pan. Bake for 35 to 40 minutes, or until it passes the toothpick test. Let cool for 20 minutes and then ice with frosting and eat!

Tuesday, September 7, 2010

Peanut Butter Cookies

Do you love peanut butter as much as I love peanut butter?

I really like peanut butter... so much so, that I don't allow myself to eat it normally. It starts out with just a spoonful, and then I'm eating it on apples, and bananas, and before you know it I've eaten half a box of cheez-its and carefully spread peanut butter on each little cracker before consuming it. It all ends badly, and with a new wardrobe as well, unfortunately. But I'm babbling.....

Let me tell you about the one way that I do allow myself to indulge in my love for the stuff....


peanut butter cookies. Just like your mom used to make, but better. Or maybe it's just that my mom always used a box mix... who knows.

cinrose chic 2-7644

Trust me.

cinrose chic 2-7632

These are good.

cinrose chic 2-7656

My sous chef helped me with this particular batch and wanted to know if he had to make the cross hatch pattern on the top of the cookies.

cinrose chic 2-7640

I told him that they weren't peanut butter cookies unless you do that thingy with the fork on the top. And then I fired him. And then I was stuck pressing the fork into 3 dozen of the suckers all by myself. I shall have to come up with a better and more fool-proof strategy next time around.

cinrose chic 2-7646

Peanut Butter Cookies
from The Grand Central Baking Book

3 cups all purpose flour
2 teaspoons baking soda
1 teaspoon salt
1 cup (2 sticks) unsalted butter, at room temp
1 cup granulated sugar
1 cup light brown sugar, lightly packed
1 cup peanut butter, at room temp (I like to use chunky...the peanuts really add something if you ask me)
2 eggs, at room temp
2 teaspoons vanilla extract

Preheat your oven to 350 degrees.

Add flour, baking soda, and salt into a bowl and mix to combine.

In a stand mixer, (or with a handheld) beat butter and both sugars on medium speed for about 5 minutes until well combined as well as fluffy and light in color. Add the peanut butter and mix for another minute or so until well combined.

Crack the eggs into the mixer one at a time and mix until combined. Then add the vanilla. Now you're ready to gradually add the dry ingredients. Add the dry ingredients to the mixer in 2 to 3 batches, mixing until just combined.

Use your cookie scoop or other scooping method and dole out mix onto cookie sheet. Press lightly with fork to make required pb cookie pattern on top.

Bake for 10-13 minutes until golden and then eat them for heavens sake!

Tuesday, August 31, 2010

Balsamic and Brown Butter Ravioli

Has your life gone a little crazy? Mine has.

cinrose brown 2-7602

Do you barely have time to cook dinner, let alone time to sit down and eat it? Yup, me too.

cinrose brown 2-7604

Let me share a dinner with you that not only took about 15 minutes from start to finish to whip up, but looked very gourmet, and impressed the pants off of both my diners on an evening a while back.

cinrose brown 2-7600

Ravioli.....yum. Simple? Definitely.

cinrose brown 3-7608

Toast some walnuts up, melt some butter in a pan, add some balsamic, pour it over the cooked ravioli of your choice, and presto! Dinner in about 15 minutes or so. We had it with a simple side salad and some crusty bread and I couldn't have been happier. Thank you Giada. You've done it again.


Balsamic and Brown Butter Ravioli
adapted from Giada De Laurentiis and foodnetwork.com

***you can easily dress this up with some mushrooms and onions and perhaps some parsley or basil......ahhhhhhh the possibilities.....

18 to 20 ounces store-bought ravioli, of your choice (2 packages depending on what brand you buy)
6 tablespoons unsalted butter
2 tablespoons balsamic vinegar
1/2 teaspoon salt
1/4 teaspoon freshly ground black pepper
1/3 cup toasted, chopped walnuts
1/4 cup grated Parmesan


Bring a large pot of salted water to a boil over high heat. Add the ravioli and cook 4 to 5 minutes, until tender but still firm to the bite, stirring occasionally. Drain ravioli onto a large serving platter.

Meanwhile, in a medium saucepan cook the butter over medium heat, stirring occasionally. When the foam subsides, and the butter begins to turn a golden brown, about 3 minutes, turn off the heat. Let cool for about 1 minute. Stir in the balsamic vinegar, salt, and pepper.

Transfer the ravioli to the pan saucepan with the balsamic brown butter. Sprinkle walnuts and Parmesan over the top. Serve and eat immediately.

Saturday, August 21, 2010

Semi-Dark Chocolate Brownies


Brownies are one of my all time favorites.....

soulshine 4-8652
I tend to think that they speak for themselves.  Can you see all that rich, chewy goodness?  Can ya?

soulshine 4-8633

I have to say that my favorite part of a brownie is, and has always been the crispy, crunchy, crust that forms on the top.  I always break that off and eat it first.

soulshine 4-8666

These were heaven.  If you love dark chocolate, these are a must.  Heck, if you love brownies, these are a must. 

Williams-Sonoma,  I love you....and your brownies.


Semi-Dark Chocolate Brownies
adapted from Williams-Sonoma Essentials of Baking

4 oz unsweetened chocolate (1 bar), broken roughly into 1/2 inch pieces
2 oz semisweet chocolate (1/2 bar), broken roughly into 1/2 inch pieces
3/4 cup unsalted butter (6 oz)
3 large eggs
1 3/4 cups granulated sugar
1/4 teaspoon salt
2 teaspoons vanilla extract
1 cup plus 2 tablespoons all purpose flour

Preheat oven to 350 degrees.  Butter an 8-inch square baking dish.  Then fold two separate pieces of parchment paper to the width of the dish, and then lay them in the dish cross-wise, for easy removal of brownies after baking.

Place both chocolates and the butter in a double boiler and heat, stirring frequently, until melted and combined.  Remove from heat and let cool.

In a large bowl, mix eggs, sugar, salt and vanilla until combined.  Once the chocolate mixture has cooled, add it to the egg mixture and combine slowly until just blended.  Add the flour to the wet ingredients and mix until combined.

Pour brownie batter into prepared dish and spread evenly.  Bake until a toothpick inserted in the center comes out almost clean or with crumbs.  Note:  The directions in the original recipe say to bake for 35-40 minutes.  I baked my brownies in an 8 inch square glass pyrex dish.  They took at least 60-65 minutes to bake thoroughly.  Rule of thumb...when the brownies are done, the top should be crispy and firm and the toothpick should not have batter on it when inserted and removed.  To be safe, I baked the brownies the recommended 40 minutes and then added in 5 minute increments from there.  If there's anything I hate, it's brownies with a mushy center and bottom. If you prefer your brownies to have a more moist or chewy consistency, 40 to 45 minutes may be fine.

When brownies are done baking, remove from oven and place on a rack to cool for 15 minutes.  Then gently lift the brownies out of the dish for further cooling using the placed parchment paper.  Slice and eat.

Thursday, August 19, 2010

Grand Central Chocolate Chips

In search of that perfect chocolate chip cookie.....

isab soulshine 3-7448

...or at least for something to keep the 'natives' happy for another week.

isab soulshine 3-7453
Chocolate chip cookies are universally accepted by the natives.....at least by my natives.

isab soulshine 3-7426

When I buy cookies from the store these days, there is usually a small uprising....my natives are rather spoiled. 

isab soulshine 3-7414
The natives were a little restless on this particular day, and so my sous chef (a native himself) baked these cookies for me, after I prepared the dough, of course. 

isab soulshine 3-7419
The cookies are fabulous, the natives were happy for yet another week, and what can I say, life was good.

isab soulshine 3-7434
Life is always good with chocolate chip cookies in the mix...... at least that's my theory.


Adapted from The Grand Central Baking Book by Piper Davis and Ellen Jackson
a fabulous baking book, that I highly recommend, by the way..... I love it for this as well.  If you love baking, it's a worthwhile investment for any cookbook collection.

Recipe makes about 3 dozen

2 cups all purpose flouir
1 teaspoon baking soda
3/4 teaspoon baking powder
1 teaspoon salt
1 cup (or 2 sticks) unsalted butter
1 cup granulated sugar
1 cup light brown sugar (lightly packed)
2 eggs, at room temp
2 teaspoons vanilla extract
2 3/4 cups rolled oats
1 cup bittersweet chocolate chips
1/2 cup milk chocolate chips
1/2 cup white chocolate chips (or more milk chocolate)


Preheat oven to 350 degrees.  Line a baking sheet with parchment paper

Measure the flour, baking soda, baking powder and salt into a bowl and combine.

In a stand mixer, beat together butter, and both sugars until combined and 'fluffy' (about 3 to 5 minutes).  Make sure you scrape the sides and get it combined well.  Add eggs one at a time, and mix til just combined.  Add in vanilla.

Add the dry ingredients to the wet in 2 to three batches.  Mixing after each addition until just incorporated.  Combine both chocolate chips and oatmeal together in a separate bowl and add in batches once again, until just combined.

Use cookie scoop, or desired cookie scooping utensil and place dough in desired amounts on cookie sheet.  I am a big fan of the 1 tablespoon-sized cookie, myself.  Bake 10 to 13 minutes until evenly browned and golden along the edges.

Remove from oven, let cool, and call in the official cookie taste testers!

Friday, August 13, 2010

Ina's Tiramisu

Indulge  verb
to yield to an inclination or desire; allow oneself to follow one's will


Oh my goodness, is all I have to say.

cinrose chic-8452-2
This was heaven.

cinrose chic-8465-2
That Ina, she's really onto something. 

cinrose chic-8446
Although I do blame Ina for the several sessions I spent on the elliptical trainer to rid myself of the guilt of eating a piece of this.  

cinrose chic-8438
On the other hand, it only had 1/4 of a cup of sugar in the recipe, so it was practically healthy, right?  Not.  This has 'danger' written all over it, but I was all done fooling around just gazing at the picture in the cookbook.  I just had to have some for myself and oh my goodness..... did I say heaven?  Heaven.  Definitely.

cinrose chic-8476

My sous chef topped it with the most perfect chocolate curls for me.  He comes in handy sometimes.  I think I'll keep him.

cinrose chic-8450-2

Have friends coming over for dessert?  Going to someone else's place for dessert?  Just feeling like eating dessert?  Make this.  You won't be sorry.


Ina's Tiramisu
adapted from Ina Garten and foodnetwork.com

6 extra-large egg yolks, at room temperature
1/4 cup sugar
1/2 cup good dark rum, divided
1 1/2 cups brewed espresso or coffee, divided
16 to 17 ounces mascarpone cheese (2 containers)
30 Italian ladyfingers, or savoiardi (one package depending on what dish you use)
Bittersweet chocolate, shaved or grated (I used my zester)

Whisk the egg yolks and sugar in the bowl of an electric mixer fitted with the whisk attachment on high speed for about 5 minutes, or until very thick and light yellow.

Lower the speed to medium and add 1/4 cup rum, 1/4 cup espresso, and the mascarpone. Whisk until smooth.

Combine the remaining 1/4 cup rum and 1 1/4 cups espresso in a shallow bowl. Dip 1 side of each ladyfinger in the espresso/rum mixture and line the bottom of a loaf pan (or other similarly sized dish). Spread half the espresso cream mixture evenly on top. Dip 1 side of the remaining ladyfingers in the espresso/rum mixture and place them in a second layer in the dish. Spread the rest of the espresso cream over the top. Smooth the top and cover with plastic wrap. Refrigerate overnight.

Before serving, sprinkle the top with shaved chocolate.

***Note:  I have only made this recipe once, and I made it as written above, but the next time I make it, there will be a few changes. I used Myers Rum when I made it, cause that was what was in my 'liquor cabinet'.  I have been told that Myers is stronger than your average rum..... the cake reeked of rum, consequently.  Well, maybe 'reeked' is a strong word....but I could smell the cake from across the room.  Don't get me wrong, the cake was very good.  However, my husband made a comment about not being able to pass a breathalizer test after eating a small slice though.... lol, and rum is his alcohol of choice.  I will agree, that perhaps you should not go for a joy ride around the neighborhood after partaking in this, but I think he was exagerrating just a little bit.  Next time though, I might eliminate the 1/4 cup of rum that is put into the mascarpone mixture (perhaps the 1/4 cup of coffee that is thrown in the mascarpone as well).  The 1/4 cup rum that is incorporated into the coffee and used to dip the ladyfingers is plenty, trust me.  Perhaps next time I seek out some plain old Bacardi.....or I suppose you could eliminate the alcohol all together and just run with your favorite coffee....but alas, an experiment for another time.